Free MD5 Decrypter | Online MD5 Decryption  

Posted by dharmendra

Hi guys,i started writing this article because yesterday i was trying to crack the "Hash" for an admin password,the site which was vulnerable was obviously taken down by me and now,thanks to me they have fixed that problem.So one of the biggest difficulties while your hacking is "Cracking" a hash.While Cracking a hash is difficult,It is better to compare your has with a few existing decrypted hashes.In this article,I'll give you some such sites which does the job neatly.


What is a MD5 Hash ?

To put it in a nutshell,its just a string/integer (or Word/Number)which is encrypted using a particular computer algorithm.While some algorithms are easy to crack,Some take Ages to crack one single password ! To read more on hash tables : http://www.searchr.us/web-search.phtml?search=What+is+a+hash+rable

Why do we need to Crack ?

Chill out guys ! We are hackers ! That's what we do,find and crack staff so that we can make the world better ithout vulnerabilities.Seriously,MD5 hashes are used in all types of data encryption.

List of Online Services:


The given below are list of free services no nothing is paid service around here !


If this doesn't work out then you have to use a software to decrypt it but it could take a lot of time.

Cheers !

Adsense code in Blogger post Body  

Posted by dharmendra

One of the known tips for improving the performance of your Google AdSense ads is knowing where to place the ads. In this guide, we shall discuss the modification you can make to your Blog template to have your Google AdSense ads appear between your post title and post body, or between your post body and post footer. Also, we shall have the AdSense ads appear on every individual post.

Choosing a best placement for your AdSense ads will attract more attention; attention leads to clicks; and clicks bring you AdSense revenue. Easier said. While people may have theories on where the ideal AdSense spot ought to be, there is really no standard answer because it depends very much on your Blog's layout, contents, theme, etc. If you have been following the changes made to our Blog, you would agree that we are no guru at this. We had merely placed the ads where they fit aesthetically and not where they will get the most attention. Nevertheless, if you would accept our two cents' worth of opinion, try to put yourself in the minds of your readers. Ask questions like why readers visit your Blog, which section of the Blog are they most interested in, and whether placing an ad at a particular area will distract, annoy or please them.

Many people believe that having AdSense ads just before or after the Blog posts will best optimize their performance. For the purposes of this article and to give you an idea how it would look, we have inserted the AdSense code into our template to have the ads appear immediately below the article and before the post footer. If you think you would like to do the same for your Blog, the following are the steps you should take.

Update: A section on Using Blogger Feature to insert the AdSense Ads after every post.

Using Blogger Feature

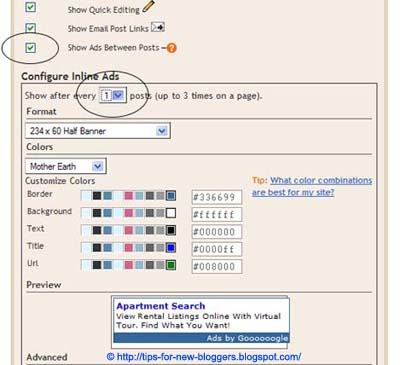
If you merely want an Ad to appear after every post or every few posts, use this Google feature instead. Go to Template -> Page Elements and you see in your layout the heading “Blog Posts”. Click the “Edit” link at the bottom right corner. You will see this screen.

AdSense Code in Blogger Post Body

We assume you have a Google AdSense account. If you don't, you can create one using the same login through your Google account. You will be assigned a Publisher identity number which shall appear in all your AdSense codes.

Tick the “Show Ads Between Posts.” You can select whether to show ads after every post or after several posts. In accordance with AdSense TOC, a maximum of 3 Ads will be displayed. Choose the ad format and color scheme. Save the changes and refresh your Blog to see the Ads.

While using this Blogger feature is simple and easy, you may want more control over the position of the Ads. For example, you may want it between the title and posts rather than after the posts. The following guide will show you how you can do that.

More Ad locations

Log in to your Google AdSense account.

AdSense Code in Blogger Post Body

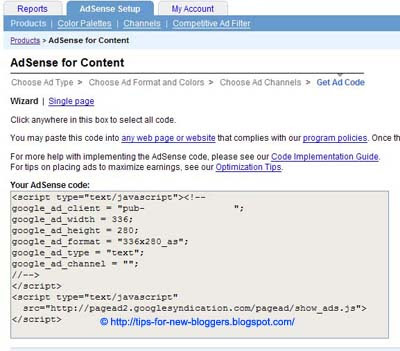
Go to AdSense Setup -> Products and choose “AdSense for Content”.

Next, select “Ad unit” and follow their instructions on picking the size of ad, color combination, and so on, right till the end when they automatically generate a HTML code for you. Copy this code and paste it into Microsoft Notepad. (If you are a WinXP user, click the Start button at the bottom left corner of your screen. Under All Programs -> Accessories, you should see the MS Notepad icon.)

AdSense Code in Blogger Post Body

Change the AdSense code

This heading may sound misleading. We are not at all altering the code but converting some of the characters to character entities. We have to parse the AdSense code so that it can be included into your Blog template. This is not against AdSense rules because after the code is inserted into the template, when you view the source code of the template, you should see the exact same AdSense code that Google has generated for you. Indeed, if it is anything different, it means that you have not parsed it correctly and should review the code again. Parsing the code essentially involves replacing the following HTML characters:-

< with &lt;
> with &gt;
" with &quot;

Your final Google AdSense Code should look something like this:-

&lt;script type=&quot;text/javascript&quot;&gt;&lt;!--
google_ad_client = &quot;pub-0000000000000000&quot;;
google_ad_width = 336;
google_ad_height = 280;
google_ad_format = &quot;336x280_as&amp;amp;quot;;
google_ad_type = &quot;text&quot;;
google_ad_channel = &quot;&quot;;
google_color_border = &quot;FFFFFF&quot;;
google_color_bg = &quot;FFFFFF&quot;;
google_color_link = &quot;000000&quot;;
google_color_text = &quot;000000&quot;;
google_color_url = &quot;000000&quot;;
//--&gt;&lt;/script&gt;
&lt;script type=&quot;text/javascript&quot;
src=&quot;http://pagead2.googlesyndication.com/pagead/show_ads.js&quot;&gt;
&lt;/script&gt;


Insert code into template

Login to your Dashboard. Go to Template -> Edit HTML and click the box next to “Expand Widget Templates”.

AdSense Code in Blogger Post Body

Block copy the entire HTML code for your site that you presently have and save it in a separate text file in MS Notepad. You can also click the "Download Template" link to backup the template. This is one of the two necessary steps whenever you want to change the template. The second step is to “Preview” the new changes, and save the changes only when you are satisfied. The backup you have saved in a text file will come in handy when you accidentally click to save the changes without previewing them. With a backup, you can easily restore the template to the prior state if need be.

Now search for post.body through your browser's search function (Ctrl+F for Firefox and IE). You should see these lines:-

<div class='post-body'>
<p><data:post.body/></p>
<div style='clear: both;'/> <!-- clear for photos floats -->
</div>


If you want the AdSense ads to appear between the post title and post body, add the following code above the orange lines. If you want the AdSense ads to appear immediately after every individual post, add the following code below the orange lines. The code to add is:-

<div style='float:left;'>
AdSense Code
</div>


The AdSense Code is the one you have amended above in MS Notepad. Do NOT save the template, but click the Preview button to see if you like the placement of the AdSense ads.

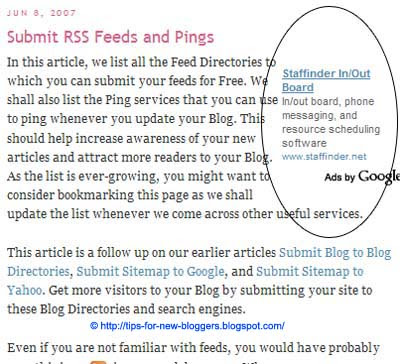
Do you want to have the AdSense code on the left of your text as shown in this screenshot?

AdSense Code in Blogger Post Body

Choose the smallest AdSense format like 125x125. Insert the AdSense code here:-

<div class='post-header-line-1'/>
<div style='float:left;'>
AdSense Code
</div>
<div class='post-body'>
<p><data:post.body/></p>
<div style='clear: both;'/> <!-- clear for photos floats -->
</div>


If you want the Ads on the right of the text, like this:-

AdSense Code in Blogger Post Body

Insert the code as follows:-

<div class='post-header-line-1'/>
<div style='float:right;'>
AdSense Code
</div>
<div class='post-body'>
<p><data:post.body/></p>
<div style='clear: both;'/> <!-- clear for photos floats -->
</div>


Set the AdSense ad margins

If your AdSense ads are too close to the edge, you may set a margin in the style tag. To give you an idea how wide the margin should be, you can see the sample in our other Business Fables blog where the left margin is set to 30px. The code used was:-

<div style='float:left; margin-left:30px'>
AdSense Code
</div>


Should you want to align the AdSense ad to your text, you can specify a margin or padding around the entire AdSense code. The code you can use is:-

<div style='float:left; margin:5px 10px 15px 20px'>
AdSense Code
</div>


The first number 5px is for the top margin, 10px is for the right margin, 15px for the bottom margin, and 20px for the left margin. You should of course change these values to suit your template.

Preview the template and if you are satisfied, save the template and refresh your Blog to see the new positions of your AdSense ads.

Other than Google Ads, you can learn how to place AdSense Product Referrals in your Blog.

Adsense Product Referrals in Blogger  

Posted by dharmendra

If you have an AdSense account, this latest launch of Google AdSense Referrals 2.0 is something you must look at. In addition to the traditional Google products, there is now a very long and varied list of products that you can include in your Blogs and offer your readers. In contextual ad targeting, the AdSense ads that appear in your Blog may not always be relevant, especially if you do not have a consistent theme in your posts. With AdSense Referrals, you are now able to pick the specific products that you like, and are paid the referral fees. In Blogger.com, it is easy to insert an AdSense for content widget but not a Referral unit. This article will explain how you can fill the “shopping cart”, customize the ad colors, insert the code and have the Referral ads appear just before or after your Blogs posts.

Before we begin, we assume that you already have an AdSense account. If you don't, you can always sign up for a Google AdSense account. AdSense is by far one of the preferred ways of monetizing your Blogs and they have various features which can earn you that extra income and revenue through blogging.

Setting up the Referral ads

1. Country and Language

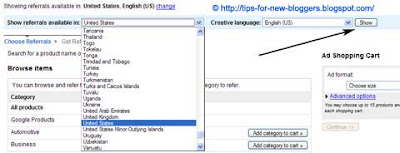
Login to your AdSense account, click the “AdSense Setup” tab and choose “Referrals”. Somewhere near the top, you will see the default country and language that your Referral ads will be based in. If your readers are mainly from another country or are using another language, change the preferences and click “Show”. Since this is a new feature, some of the languages may see fewer advertisers.

AdSense Product Referrals in Blogger

2. Ad Format

Although you can begin to view the products and add them to the Shopping Cart, it may be wise to set the ad format at this stage. Some advertisers have predetermined ad formats which may not fit into your desired size. Choose the “Ad format” size that you like.

3. Choice of products

It is time to go shopping for the relevant ads. There are three ways you can do that:-

a. Keyword

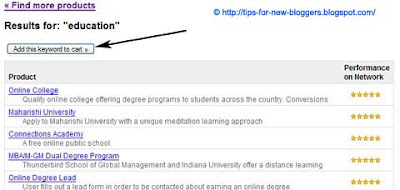
Enter a keyword that is in line with your theme. You will be shown a list of products that match the keyword (maximum of ten keywords). You can click “Add this keyword to cart.” When you use this option, Google AdSense will rotate the ads to match this keyword and new products will be added automatically without further action at your end.

AdSense Product Referrals in Blogger

b. Category

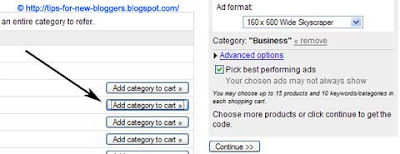
You can browse by category. View the products. If you find a suitable category for your Blog, you can add the entire category to the Shopping Cart. New products in the category will be automatically rotated to show the highest-paying product ads in your Blog. You can have up to ten categories added into the Shopping Cart.

AdSense Product Referrals in Blogger

c. Products

You can also choose the specific products (a maximum of fifteen) to be added to your ad unit. View the products and click the link. You will be shown the referral fees and the terms. There may be different text ad formats and image ad formats that you can choose from. Where the ad size does not fit into the ad unit format that you have earlier determined, you will see a message “This size not compatible with currently chosen ad format.” Choose the one that fits and the product will appear in your Shopping Cart.

AdSense Product Referrals in Blogger

4. Best performing ads

You can tick the “Pick best performing ads” option to have Google AdSense display ads that they believe will bring you more revenue. Since it is based on Google's contextual targeting and analysis, the ads you chose may not be shown.

5. Advanced Options

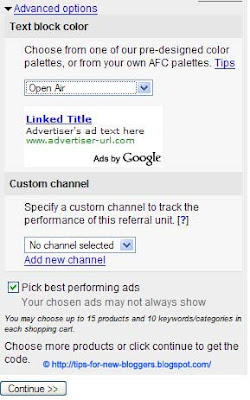
Click “Advanced Options” and you will be asked to choose a color combination and a channel. Most of us would like the colors to blend with our Blogs. If that were the case, do not use the “Default Google palette” but choose instead any of the “AdSense palettes.” We shall talk about changing the colors later.

You can specify a custom channel to track the performance of these ads. This is particularly useful if you have several blogs and you want to know how well the ads in each blog have performed. Some may want to try out different ad positioning and assign a tracking channel to each of the ad units to monitor the clicks.

AdSense Product Referrals in Blogger

6. Colors customization

Once you are done, click “Continue” and you will be shown the Referrals code that you can add to your web site. The code looks something like this:-

<script type="text/javascript"><!--
google_ad_client = "pub-0000000000000000";
google_ad_width = 160;
google_ad_height = 600;
google_ad_format = "160x600_as";
google_cpa_choice = "xxx";
google_color_border = "FFFFFF";
google_color_bg = "FFFFFF";
google_color_link = "0000FF";
google_color_text = "000000";
google_color_url = "008000";
//-->
</script>
<script type="text/javascript" src="http://pagead2.googlesyndication.com/pagead/show_ads.js">
</script>

The parts in red are the color codes. You can change the color values and assign different colors to the Referral ad border, background (bg), link, text or url. You may refer to the list of color codes and values or look at your template to find out what colors have been used for your Blog.

7. Placement of code

To insert the code into the Blog, go to Template -> Page Elements -> Add a Page Element either in your sidebar or post body area, and select HTML/JavaScript. Copy and paste the entire JavaScript code and save.

If you would like to have AdSense Referrals appear in every individual post, between your post title and post body, or between your post body and post footer, you may follow this guide AdSense Code in Blogger Post Body, parse the code and place it into the appropriate part of your template.

Under the current rules, you can place up to three AdSense Referral units and three standard AdSense for content units on a single webpage. Therefore, if you have placed the AdSense Referral code into your template, and there are five posts in your page, the ads will only be shown in the first three posts.

Freeware Alternatives to PhotoShop  

Posted by dharmendra

Photoshop is the most powerful and popular Image editor software and it has loads of options of drawing tools , filters , color adjustment capabilities and much more for manipulating images in almost any way.But it is not a freeware and is too expensive.

There are some Free and powerful Softwares that we can consider as great alternatives to Photoshop if you do not want to spend much for just a software.


GIMP
GIMP (GNU Image Manipulation Program) is a freely distributed piece of software suitable for such tasks as photo retouching, image composition, and image authoring.It can be used as a simple paint program, an expert-quality photo-retouching program, an online batch-processing system, a mass production image renderer, or an image-format converter. GIMP is modular, expandable, and extensible.GIMP works on many Operating Systems and has many format support .The advanced scripting interface allows everything from the simplest task to the most complex image-manipulation procedures to be easily scripted.


Paint.NET

Paint.NET is free image and photo editing software.It utilises the Microsoft .NET framework.It features an intuitive and innovative user interface with support for layers, unlimited undo, special effects, and a wide variety of useful and powerful tools.Many special effects are included for enhancing images like blurring , sharpening , red-eye removal , distortion and much more.
An active and growing online community provides friendly help, tutorials, and plug-ins.

Cut and split your MP3s easily  

Posted by dharmendra

Lets Check out some freeware softwares which lets you cut and split your MP3 files.These Softwares can be useful if you want certain part of a song as a ringtone for your cell phone or if the size of a MP3 file is going out of space,then it can be cut and stored in two CDs , etc


MP3 Cutter (from Videoripper projects)


Mp3 cutter is a light software which allows you to cut or trim your mp3 files.
It has a simple interface and its very easy to use.
Its size is about 400 KB.
Download and know more about MP3 Cutter here http://www.videoripper.org/programs/


MP3 Cutter 1.3

MP3 Cutter comes with advanced facilities like display of start point, end point, and length of selection.
It can play the selected part of the (clip) song.
Includes volume controller.

Download here AivSoft.com or from here
Size :2.77 MB

Stop Viruses from USB Devices  

Posted by dharmendra

Panda USB Vaccine

The problem with AUTORUN feature, widely critizised by the security community, is used by malware in order to spread by infecting as soon as a new USB drive is inserted in a computer.

Due to the large amount of malware-related problems associated with Microsoft AutoRun Panda Security Research  created a free utility called Panda USB Vaccine.

Panda USB Vaccine can be used on individual USB drives to disable its autorun.inf file in order to prevent malware infections from spreading automatically.

Once executed the user can choose two types of vaccinations: Computer Vaccination or USB Drive Vaccination. USB Vaccine allows users to vaccinate their PCs in order to disable autorun completely so that no program from any USB/CD/DVD drive can auto-execute. This is a really helpful feature as there is no user friendly and easy way of completely disabling autorun on a Windows PC.

Download from Download.com
Size: 720.45K

High-quality protection against viruses and spyware from Microsoft  

Posted by dharmendra

Microsoft Security Essentials

With Microsoft Security Essentials , you get high-quality protection against viruses and spyware, including Trojans, worms and other malicious software. And best of all, there are no costs or annoying subscriptions to keep track of , it is completely free.

Security Essentials is easy to install and easy to use. Updates and upgrades are automatic, so there's no need to worry about having the latest protection.

You can know the status of your PC easily  - when the Security Essentials icon is green, your status is good and is compatible with windows7.

Security Essentials is a light weight app and runs quietly in the background, only alerting you if there's something you need to do.


But Your PC must run genuine Windows to install Microsoft Security Essentials.So install this software only if your Windows is Genuine.

Download here http://www.microsoft.com/security_essentials/
Size :8.61mb

How to convert your PDFs to MS Word Docs  

Posted by dharmendra

If you are working on a file in PDF format, and you want to edit the file in Word, you can convert it to a Word document and then you can edit it.Check out our short reviews of few free PDF converters.


Free PDF to Word Doc Converter


Free PDF to Word Doc Converter is a desktop document conversion tool to convert Adobe PDF to MS Word file. The program can extract text, images, and shapes from PDF file to DOC file and preserve the layout. It can convert all the pages, or any part of the PDF file. It is a standalone program, so you can convert PDF to Word Doc without Adobe Acrobat Reader or Microsoft Word installed.
Download here http://www.hellopdf.com/download.php


Free PDF to word Converter 1.3
PDF to Word Converter enable you to export the text, images, and other contents from PDF document into word document, so you can reuse your PDF content. Free PDF to Word Converter will preserving text, layout, and bitmap images in the generated word document.
Download here http://www.free-pdf-to-word.com/download.html


Advanced PDF to Word Converter

With this converter, you can edit and reuse your PDF content. It can export the text, images/graphics from PDF document with accurately preserving the original text, tables, graphics, & layout. Advanced Pdf to Word Converter Free does not need any software support, as Adobe Acrobat, or even Acrobat Reader.
Download here


You can also convert your PDFs online if you do not want to download softwares using below links .

PDFtoWord.com

5 Free Useful PDF Tools  

Posted by dharmendra


 [images.jpg]


Let's check some free and useful PDF tools which we can consider as alternatives to Adobe's High end products to edit , create ,convert and enhance PDF documents.


PDF ReDirect is a fast, free, and easy-to-use PDF creator. It has no restrictions and no watermarks.Features include encryption, full merging and PDF preview.PDF ReDirect installs as a virtual printer so you can convert documents to PDF files from any program that supports printing.

This is one completely free and simple PDF editing and creating software, it can help you to create your pdf documents by yourself in minutes.Free PDF Editor comes with a very intuitive GUI that is easy to understand even for the beginner users.It is one WYSIWYG PDF builder, what you see is what you get, and you can insert text, image and shape, then drop, resize and move these PDF elements with your mouse.
Some PDF Image Extract is an easily tool to extract images from PDF files. Some PDF Image Extract can easy help you to extract images in PDF files to TIFF, JPEG, BMP, GIF, PNG, TGA, PBM, PPM.
PDF Xchange Viwer is a  free alternative to Adobe Acrobat Reader.It allows users to View Adobe compatible PDF files and perform additional functionality too like Printing, exporting PDF's to numerous Image based file types, Page Commenting and Annotations.
This freeware lets you convert PDF files to Word .doc files. You can also customize your output folder, and choose a destination format in RTF or DOC.But  the layout of the output doc can be different than input PDF if the PDF's layout is very complex.

Check "How to convert PDFs to MS Word Docs" for PDF to Doc free Converters.

Use system restore without loading windows  

Posted by dharmendra

What if your system begin to malfunction at the middle of the road while you were playing with computer.. and what if you are not able to load windows.. then only alternative is to use system restore.. but.. how will you load system restore without loading windows..
If you have enabled System Restore, you can use it when you fails to boot into Windows.
How to do:
Restart your computer.
Press F8 before the Windows Logo displays. (Keep pressing F8 from the starting itself)
Then the Windows Boot Menu displays.
Select Safemode With Command Prompt and hit Enter.
Windows loads to Command Prompt.
Then type the following:
%systemroot%system32restorerstrui.exe and hit Enter.
That loads the System Restore window. Continue as usual restoration.

Free For Everyone Headline Animator