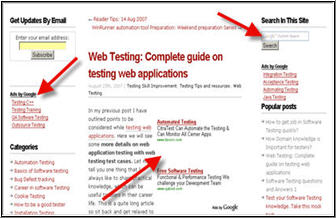
One of the known tips for improving the performance of your Google AdSense ads is knowing where to place the ads. In this guide, we shall discuss the modification you can make to your Blog template to have your Google AdSense ads appear between your post title and post body, or between your post body and post footer. Also, we shall have the AdSense ads appear on every individual post.
Choosing a best placement for your AdSense ads will attract more attention; attention leads to clicks; and clicks bring you AdSense revenue. Easier said. While people may have theories on where the ideal AdSense spot ought to be, there is really no standard answer because it depends very much on your Blog's layout, contents, theme, etc. If you have been following the changes made to our Blog, you would agree that we are no guru at this. We had merely placed the ads where they fit aesthetically and not where they will get the most attention. Nevertheless, if you would accept our two cents' worth of opinion, try to put yourself in the minds of your readers. Ask questions like why readers visit your Blog, which section of the Blog are they most interested in, and whether placing an ad at a particular area will distract, annoy or please them.
Many people believe that having AdSense ads just before or after the Blog posts will best optimize their performance. For the purposes of this article and to give you an idea how it would look, we have inserted the AdSense code into our template to have the ads appear immediately below the article and before the post footer. If you think you would like to do the same for your Blog, the following are the steps you should take.
Update: A section on Using Blogger Feature to insert the AdSense Ads after every post.
Using Blogger Feature
If you merely want an Ad to appear after every post or every few posts, use this Google feature instead. Go to Template -> Page Elements and you see in your layout the heading “Blog Posts”. Click the “Edit” link at the bottom right corner. You will see this screen.
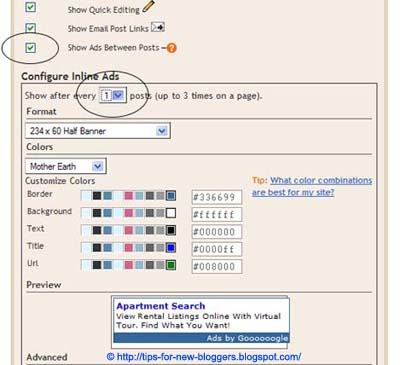
We assume you have a Google AdSense account. If you don't, you can create one using the same login through your Google account. You will be assigned a Publisher identity number which shall appear in all your AdSense codes.
Tick the “Show Ads Between Posts.” You can select whether to show ads after every post or after several posts. In accordance with AdSense TOC, a maximum of 3 Ads will be displayed. Choose the ad format and color scheme. Save the changes and refresh your Blog to see the Ads.
While using this Blogger feature is simple and easy, you may want more control over the position of the Ads. For example, you may want it between the title and posts rather than after the posts. The following guide will show you how you can do that.
More Ad locations
Log in to your Google AdSense account.

Go to AdSense Setup -> Products and choose “AdSense for Content”.
Next, select “Ad unit” and follow their instructions on picking the size of ad, color combination, and so on, right till the end when they automatically generate a HTML code for you. Copy this code and paste it into Microsoft Notepad. (If you are a WinXP user, click the Start button at the bottom left corner of your screen. Under All Programs -> Accessories, you should see the MS Notepad icon.)
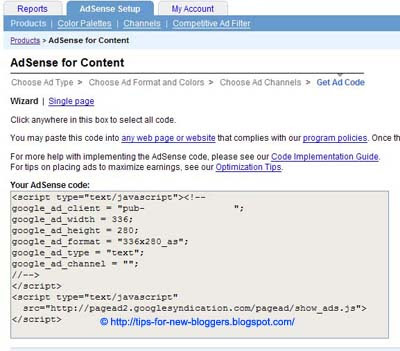
Change the AdSense code
This heading may sound misleading. We are not at all altering the code but converting some of the characters to character entities. We have to parse the AdSense code so that it can be included into your Blog template. This is not against AdSense rules because after the code is inserted into the template, when you view the source code of the template, you should see the exact same AdSense code that Google has generated for you. Indeed, if it is anything different, it means that you have not parsed it correctly and should review the code again. Parsing the code essentially involves replacing the following HTML characters:-
< with <
> with >
" with "
Your final Google AdSense Code should look something like this:-
Insert code into template
Login to your Dashboard. Go to Template -> Edit HTML and click the box next to “Expand Widget Templates”.

Block copy the entire HTML code for your site that you presently have and save it in a separate text file in MS Notepad. You can also click the "Download Template" link to backup the template. This is one of the two necessary steps whenever you want to change the template. The second step is to “Preview” the new changes, and save the changes only when you are satisfied. The backup you have saved in a text file will come in handy when you accidentally click to save the changes without previewing them. With a backup, you can easily restore the template to the prior state if need be.
Now search for post.body through your browser's search function (Ctrl+F for Firefox and IE). You should see these lines:-
If you want the AdSense ads to appear between the post title and post body, add the following code above the orange lines. If you want the AdSense ads to appear immediately after every individual post, add the following code below the orange lines. The code to add is:-
The AdSense Code is the one you have amended above in MS Notepad. Do NOT save the template, but click the Preview button to see if you like the placement of the AdSense ads.
Do you want to have the AdSense code on the left of your text as shown in this screenshot?

Choose the smallest AdSense format like 125x125. Insert the AdSense code here:-
If you want the Ads on the right of the text, like this:-
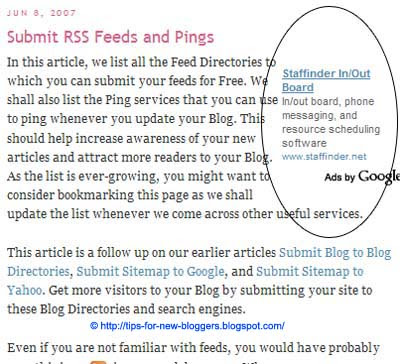
Insert the code as follows:-
Set the AdSense ad margins
If your AdSense ads are too close to the edge, you may set a margin in the style tag. To give you an idea how wide the margin should be, you can see the sample in our other Business Fables blog where the left margin is set to 30px. The code used was:-
Should you want to align the AdSense ad to your text, you can specify a margin or padding around the entire AdSense code. The code you can use is:-
The first number 5px is for the top margin, 10px is for the right margin, 15px for the bottom margin, and 20px for the left margin. You should of course change these values to suit your template.
Preview the template and if you are satisfied, save the template and refresh your Blog to see the new positions of your AdSense ads.
Other than Google Ads, you can learn how to place AdSense Product Referrals in your Blog.
Choosing a best placement for your AdSense ads will attract more attention; attention leads to clicks; and clicks bring you AdSense revenue. Easier said. While people may have theories on where the ideal AdSense spot ought to be, there is really no standard answer because it depends very much on your Blog's layout, contents, theme, etc. If you have been following the changes made to our Blog, you would agree that we are no guru at this. We had merely placed the ads where they fit aesthetically and not where they will get the most attention. Nevertheless, if you would accept our two cents' worth of opinion, try to put yourself in the minds of your readers. Ask questions like why readers visit your Blog, which section of the Blog are they most interested in, and whether placing an ad at a particular area will distract, annoy or please them.
Many people believe that having AdSense ads just before or after the Blog posts will best optimize their performance. For the purposes of this article and to give you an idea how it would look, we have inserted the AdSense code into our template to have the ads appear immediately below the article and before the post footer. If you think you would like to do the same for your Blog, the following are the steps you should take.
Update: A section on Using Blogger Feature to insert the AdSense Ads after every post.
Using Blogger Feature
If you merely want an Ad to appear after every post or every few posts, use this Google feature instead. Go to Template -> Page Elements and you see in your layout the heading “Blog Posts”. Click the “Edit” link at the bottom right corner. You will see this screen.

We assume you have a Google AdSense account. If you don't, you can create one using the same login through your Google account. You will be assigned a Publisher identity number which shall appear in all your AdSense codes.
Tick the “Show Ads Between Posts.” You can select whether to show ads after every post or after several posts. In accordance with AdSense TOC, a maximum of 3 Ads will be displayed. Choose the ad format and color scheme. Save the changes and refresh your Blog to see the Ads.
While using this Blogger feature is simple and easy, you may want more control over the position of the Ads. For example, you may want it between the title and posts rather than after the posts. The following guide will show you how you can do that.
More Ad locations
Log in to your Google AdSense account.

Go to AdSense Setup -> Products and choose “AdSense for Content”.
Next, select “Ad unit” and follow their instructions on picking the size of ad, color combination, and so on, right till the end when they automatically generate a HTML code for you. Copy this code and paste it into Microsoft Notepad. (If you are a WinXP user, click the Start button at the bottom left corner of your screen. Under All Programs -> Accessories, you should see the MS Notepad icon.)

Change the AdSense code
This heading may sound misleading. We are not at all altering the code but converting some of the characters to character entities. We have to parse the AdSense code so that it can be included into your Blog template. This is not against AdSense rules because after the code is inserted into the template, when you view the source code of the template, you should see the exact same AdSense code that Google has generated for you. Indeed, if it is anything different, it means that you have not parsed it correctly and should review the code again. Parsing the code essentially involves replacing the following HTML characters:-
< with <
> with >
" with "
Your final Google AdSense Code should look something like this:-
<script type="text/javascript"><!-- google_ad_client = "pub-0000000000000000"; google_ad_width = 336; google_ad_height = 280; google_ad_format = "336x280_as&amp;quot;; google_ad_type = "text"; google_ad_channel = ""; google_color_border = "FFFFFF"; google_color_bg = "FFFFFF"; google_color_link = "000000"; google_color_text = "000000"; google_color_url = "000000"; //--></script> <script type="text/javascript" src="http://pagead2.googlesyndication.com/pagead/show_ads.js"> </script> |
|---|
Insert code into template
Login to your Dashboard. Go to Template -> Edit HTML and click the box next to “Expand Widget Templates”.

Block copy the entire HTML code for your site that you presently have and save it in a separate text file in MS Notepad. You can also click the "Download Template" link to backup the template. This is one of the two necessary steps whenever you want to change the template. The second step is to “Preview” the new changes, and save the changes only when you are satisfied. The backup you have saved in a text file will come in handy when you accidentally click to save the changes without previewing them. With a backup, you can easily restore the template to the prior state if need be.
Now search for post.body through your browser's search function (Ctrl+F for Firefox and IE). You should see these lines:-
<div class='post-body'> <p><data:post.body/></p> <div style='clear: both;'/> <!-- clear for photos floats --> </div> |
|---|
If you want the AdSense ads to appear between the post title and post body, add the following code above the orange lines. If you want the AdSense ads to appear immediately after every individual post, add the following code below the orange lines. The code to add is:-
<div style='float:left;'> AdSense Code </div> |
|---|
The AdSense Code is the one you have amended above in MS Notepad. Do NOT save the template, but click the Preview button to see if you like the placement of the AdSense ads.
Do you want to have the AdSense code on the left of your text as shown in this screenshot?

Choose the smallest AdSense format like 125x125. Insert the AdSense code here:-
<div class='post-header-line-1'/> <div style='float:left;'> AdSense Code </div> <div class='post-body'> <p><data:post.body/></p> <div style='clear: both;'/> <!-- clear for photos floats --> </div> |
|---|
If you want the Ads on the right of the text, like this:-

Insert the code as follows:-
<div class='post-header-line-1'/> <div style='float:right;'> AdSense Code </div> <div class='post-body'> <p><data:post.body/></p> <div style='clear: both;'/> <!-- clear for photos floats --> </div> |
|---|
Set the AdSense ad margins
If your AdSense ads are too close to the edge, you may set a margin in the style tag. To give you an idea how wide the margin should be, you can see the sample in our other Business Fables blog where the left margin is set to 30px. The code used was:-
<div style='float:left; margin-left:30px'> AdSense Code </div> |
|---|
Should you want to align the AdSense ad to your text, you can specify a margin or padding around the entire AdSense code. The code you can use is:-
<div style='float:left; margin:5px 10px 15px 20px'> AdSense Code </div> |
|---|
The first number 5px is for the top margin, 10px is for the right margin, 15px for the bottom margin, and 20px for the left margin. You should of course change these values to suit your template.
Preview the template and if you are satisfied, save the template and refresh your Blog to see the new positions of your AdSense ads.
Other than Google Ads, you can learn how to place AdSense Product Referrals in your Blog.

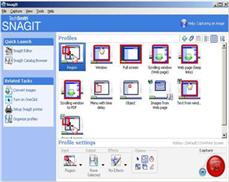 You can almost capture any type of image from SnagIt. Following are some of the great features of SnagIt tool:
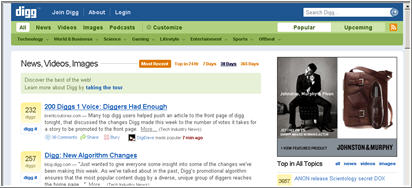
 2) Capture scrolling web pages: SnagIt can capture web pages requiring to scroll down. You can capture whole page from top to bottom and can resize it to place anywhere you want.